Description
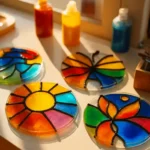
A bright and beautiful DIY art project for kids and adults alike! This faux stained glass craft uses simple materials to create colorful, sun-catching masterpieces.
Ingredients
1 plastic sheet protector, laminator pouch, or clear plastic lid
Clear school glue (about ½ bottle per design)
Black glue (or make your own: mix black acrylic paint into clear glue)
Food coloring or liquid watercolors
Paintbrushes or cotton swabs
Optional printable stained glass templates
Optional glitter
Optional suction cups with hooks (for hanging)
Instructions
1. Create the Outline (Frame)
Place your design template (like a butterfly, flower, or geometric pattern) inside the sheet protector or underneath a clear plastic lid.
Use black glue to trace over the lines of the design.
Let dry overnight to form raised outlines, mimicking real stained glass lead lines.
2. Add Color
In small cups, mix clear glue with a drop or two of food coloring or liquid watercolor.
Use a paintbrush or cotton swab to fill in each shape with the colored glue.
Be careful not to overfill — just enough to cover the space!
3. Dry Thoroughly
Leave your project flat to dry for 24–48 hours.
The glue will become translucent and shiny once completely dry.
4. Peel & Display
Gently peel your finished artwork off the plastic backing.
Use a suction cup hook or a small piece of tape to hang it in a sunny window.
Notes
To customize your design, try different shapes like animals, mandalas, or abstract patterns. Use glitter for extra sparkle. Be sure to let each layer of glue dry completely to avoid smudging. This project is best suited for a warm, dry space to speed up drying time.
- Prep Time: 30 minutes
- Category: Activities